Guided installation for Audi TTRS
Make sure your car is turned off. You do not need to unplug your battery.
Installation Steps (Similar to RS3)
Note: some of these photos are from the RS3 installation because they are so similar.
Step 1:
Open your driver side door and remove the trim using the trim removal tool that was provided in your package. It will pop right off very easily.

Step 2:
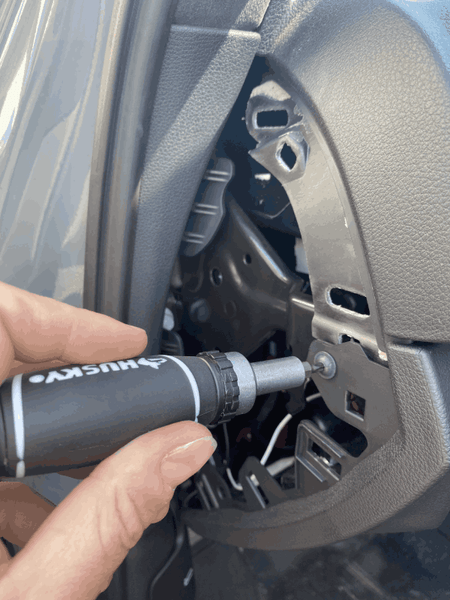
Remove the bolt pictured here so that you can remove the panel below the steering wheel.

Step 3:
Remove the two bolts on the underside holding the panel below your steering wheel. Then pull the panel off. There are a couple tabs on either side of the steering wheel that will really hold on to it. The couple cars I've done I had to really yank it off, nothing broke, but be careful once it comes undone to disconnect the headlights switch otherwise you run the risk of breaking that wire. Once you have this panel removed set it aside.


Step 4:
Remove the two fan vents under the MMI screen by gently pulling/working them out. You'll then see there is a nice gap to feed the bTres wire in the air duct down to the opening behind the panel you just removed.

Step 5:
This is where a second set of hands comes in handy. You'll want someone to hold the screen mount in place while you slowly put the fan vents back into place. Make sure to place the ribbons as pictured so they don't get mangled.

Step 6:
Here are how the cables should be ran. Both the black boxes can be zip tied together and placed to the right and under of the steering wheel. You'll likely need to remove the foam piece this next photo is pointing at in order to fit back. It serves no real purpose, it will not introduce any more noise or vibrations.

Step 7:
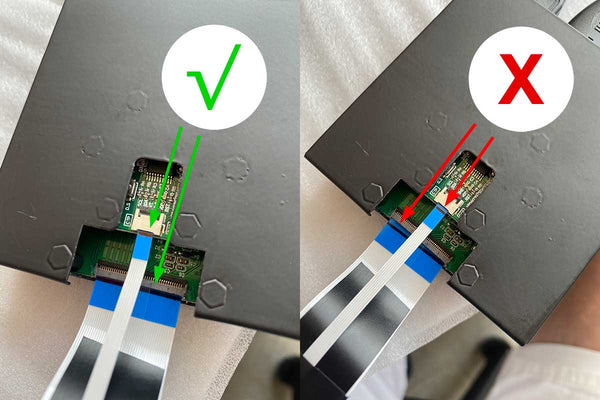
Connect the other end of the flat cables now to the smaller of the two black boxes. The blue tab should be facing up for each as shown. Also, connect the HDMI and mirco USB plugs into the other end of the box.
Tip: for each connector on the box, there is a black tab that needs to be flipped up from the back first in order to insert the cable. Once the cable is inserted you need to push the black tab down to lock it in. Once both ribbon cables are correctly inserted and the black tabs are pushed back down, you need to fold the ribbon cable back on itself and secure it into the clip as shown. This takes pressure off the connector and helps make sure the cable doesn't come loose.


Step 8:
Connect the other ends of the hdmi and usb cables to the bigger black box. The white USB cable should go in either of the black usb connectors on the box. The black mini HDMI connector should connect to the first mini HDMI port from the left. Both are highlighted here in the image below.

Step 9:
Zip tie the boxes so they are secured and do some cable management.
Optional: You can actually place this box and the bigger black box where every you like so long as it's secure. You could put both boxes in this spot or you can put the other box on the other side of the steering wheel. If you do place a box as depicted by the image, you'll likely need to remove the foam padding that is on the panel you took off before putting the panel back. That foam padding does nothing in my opinion.
Step 10:
Plug in the power cord into the power port as shown on the image above.
Step 11:
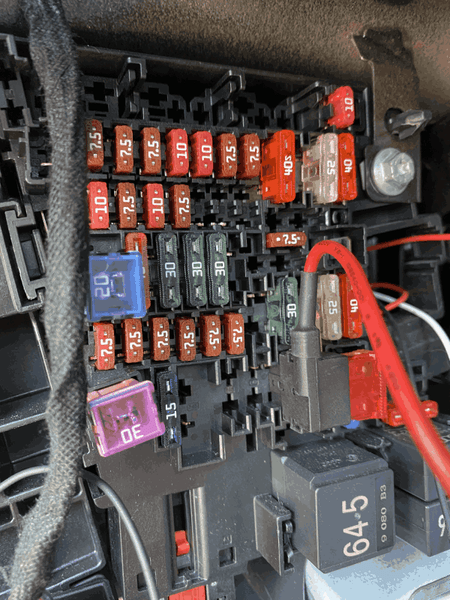
Run the other end of the power cord (red) as shown to the fuse panel. You'll remove the specifically pictured fuse, which is a switched fuse, place the fuse you just removed into the empty fuse slot on the provided splitter. Now plug the fuse splitter into the fuse slot you just pulled the fuse from. This is the only fuse I'm aware of here that is a switched fuse. So make sure to use this one. Then find a place to attach the black ground wire to. Suitable places are usually any metal bolt that is connected to a metal frame of sorts.

Step 12:
Test, when you turn on your car ignition, your bTres should come on after 30-60 seconds. If it comes on, you are likely done and ready to put everything back and enjoy. You may have some codes that you'll need to reset using bTres or ds1 web interface afterwards.
