Guided installation for Audi S6, S7, RS6 and RS7
Make sure your car is turned off. You do not need to unplug your battery.
Changing from flip up to the optional raised setup (sold separately) or back
Flip up mode

Raised mode
do not remove the hinges from the plastic mount. Use either T3 or T4 bits on the tiny screws

Installation Steps
Step 1:
Open your driver side door and remove the trim using the trim removal tool that was provided in your package. It will pop right off very easily.

Step 2:
Remove the bolt pictured here so that you can remove the panel below the steering wheel.

Step 3:
Remove the two bolts on the underside holding the panel below your steering wheel. Then pull the panel off. There are a couple tabs on either side of the steering wheel that will really hold on to it. The couple cars I've done I had to really yank it off, nothing broke, but be careful once it comes undone to disconnect the headlights switch otherwise you run the risk of breaking that wire. Once you have this panel removed set it aside.

Step 4:
Remove the climate controls using the trim removal tool provided by inserting it on each side and gently pulling until you hear/feel it click out. You will need to disconnect each of those connectors by pulling the tab up and then removing the connector.
Pro Tip: put a towel down so you don't accidentally scratch your interior.

Step 5:
Remove the bolt that you can now access through the space where the climate control was that holds the MMI DVD unit above in.
Step 6:
Slide the MMI DVD unit out only a couple inches.
Step 7:
run both the flat cables as shown.

Step 8:
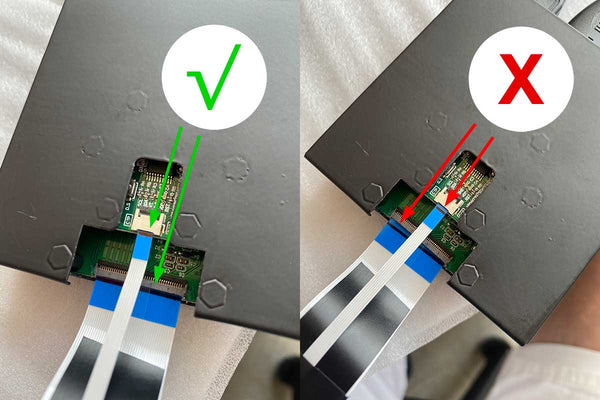
Connect the other end of the flat cables now to the smaller of the two black boxes. The blue tab should be facing up for each as shown. Also, connect the HDMI and mirco USB plugs into the other end of the box.
Tip: for each connector on the box, there is a black tab that needs to be flipped up from the back first in order to insert the cable. Once the cable is inserted you need to push the black tab down to lock it in. Once both ribbon cables are correctly inserted and the black tabs are pushed back down, you need to fold the ribbon cable back on itself and secure it into the clip as shown. This takes pressure off the connector and helps make sure the cable doesn't come loose.

Step 9:
Place this box as shown with included zip tie.
Optional: You can actually place this box and the bigger black box where every you like so long as it's secure. You could put both boxes in this spot or you can put the other box on the other side of the steering wheel. If you do place a box as depicted by the image, you'll likely need to remove the foam padding that is on the panel you took off before putting the panel back. That foam padding does nothing in my opinion.

Step 10:
Connect the other ends of the hdmi and usb cables to the bigger black box. The white USB cable should go in either of the black usb connectors on the box. The black mini HDMI connector should connect to the first mini HDMI port from the left. Both are highlighted here in the image below.

Step 11:
Plug in the power cord into the power port as shown on the image above.
Step 12:
Run the other end of the power cord (red) as shown to the fuse panel. You'll remove the second fuse from the top which is the fuel pump and place the fuse you just removed into the empty fuse slot on the provided splitter. Now plug the fuse splitter into the fuel pump fuse as shown. This is the only fuse I'm aware of here that is a switched fuse. So make sure to use this one. Then find a place to attach the black ground wire to. Suitable places are usually any metal bolt that is connected to a metal frame of sorts.

Step 13:
Test, when you turn on your car ignition, your bTres should come on after 30-60 seconds. If it comes on, you are likely done and ready to put everything back and move to the next step. You may have some codes that you'll need to reset using bTres or ds1 web interface afterwards.
Step 14:
Once you have pushed your MMI unit back into place and put the bolt back, you can install the display mount. It's as easy as pushing the extra cable slack back over the MMI unit and then push the slot on the back of the display mount into the MMI DVD slot. There will be some resistance, just push evenly across the display from the sides. Once it's all the way in it will sit very snug. You can pull it back out just as easily in the future if needed.
Nothing comes on the display after 60 seconds.
Click here for trouble shooting